
I managed to document the process over time so that i could track the progress of this project. This is also an opportunity for me to share the trials and tribulations of developing the aquascape.
Here are the tank stats:
Tank Size: 60cm x 30cm x 36cm (High Clarity / Low Iron Glass)
Substrate: ADA Aqua Soil New Amazonia (Powder Type)
Filter System: Eheim Ecco Pro 300 + 13mm gUSH glass intake / VIV glass lily pipe output
Filter Media: Seachem Matrix + Purigen
Temperature: 29-30°C (Day) / 27-28°C (Night)
Lighting: Up Aqua Z-Series Pro LED Z-20 (60cm)
Light Duration: 8 hours (10am-6pm)
Pressurized Co2: ANS Co2 System + ISTA Inline Reactor / 1bps / 30ppm
Co2 Duration: 8 hours (9am-5pm)
Carbon Supplement: Seachem Excel
Fertilizer: Tropica Plant Growth Premium Fertilizer / 1ml daily
Fan/Chiller: None
Water Change Regimen: 20% Weekly
Water Parameters (Cycled):
Tested using API Freshwater Master Test Kit
pH = 6.6
Ammonia = 0 ppm
Nitrite = 0 ppm
Nitrate = 5-10 ppm
Initial Setup
I decided on a sloped triangle layout with a path under the twisty wood, my plan was to use a variation of plants to create the path (rather than using sand), along with an assortment of grey colored rocks to provide some accents in the scape.


Once the hardscape was arranged, i proceeded to spray the soil substrate with water to make initial planting easier. I choose Eleocharis sp. 'Mini' as the main carpet plant. Echinodorus Tenellus and Cryptocoryne Parva were used as the mid-ground transition plants.
After initial planting, i filled the tank slowly using a bucket of water propped up on a ladder, hooked up to an air line tubing with flow control valve. The water was slowly trickled into the tank to minimize disturbance of the ADA soil substrate.


As the tank was filling up, i planted Rotala sp. 'Nanjenshan' and Rotala sp. 'Wallichii' as the fast growing background plants for soaking up excess nutrients during the start up stage.
Halfway filling the tank, the twisty wood started to float up... even though i had actually used the same piece of wood submerged in other tanks before, i made the mistake of removing it to put in storage and i forgot that once dried, the wood needs to be pre-soaked again in order to sink! :)
So i had to resort to the time honored method of keeping wood submerged... weigh it down with a big chunk of rock.
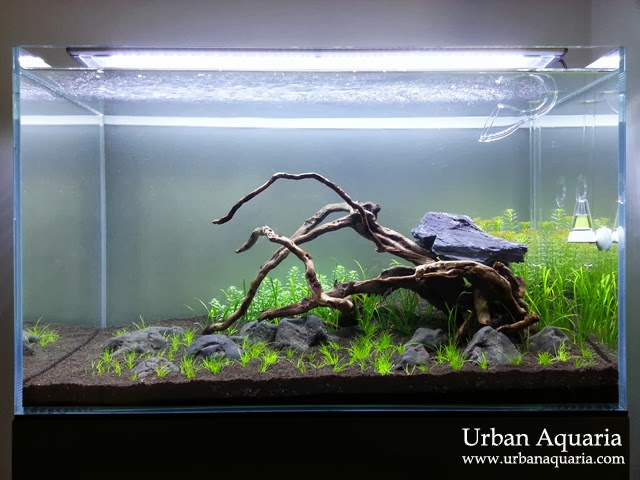
Note that the above photo was taken less than an hour after the tank was filled up... no clouding and no mess, a slow and steady filling of the tank can indeed achieve full water clarity from day one. :)
I didn't tie any moss on the twisty wood as i wanted to preserve the original detail of the wood texture instead. I was also hoping that nice green fuzz algae will eventually grow on it (yes, i actually want that algae!) to help create a natural aged look on the wood.

I cranked up the Co2 injection higher to give the plants a boost (notice my drop checker showing a bright yellow color)... no fauna in the tank yet, so no problems with elevated Co2 levels.
In this setup, i only used one set of the Up Aqua Z-Series Pro LED lightset, even though it is only 20+ watts and works out to only 1.2 watts per gallon (wpg), which many would consider as "low" lighting, this is actually more than sufficient for a tank during start up as the plant mass is still relatively low.
I have actually tried using 2 sets of these lights in other previous setups before but it eventually resulted in lots of unwanted algae growth... whereas when i switched to just using 1 set, the plants still grew well, but the algae receded and ceased to become an issue. So i've learnt my lesson and i'm now very careful to only use the appropriate amount of light to match the amount of plant growth and mass.
A portion of Seachem Matrix bio-media with established beneficial bacteria from my other existing cycled tanks was transferred to this tank's canister filter, so it helped to really speed up the cycling process. I left the tank to completely cycle over the next 2 weeks.
Week 2
Tested the water conditions and it was fully cycled by the 2nd week, thanks to the earlier addition of "seasoned" bio-media.
A group of Boraras Brigittae, Otocinclus Cocama and Neocaridina Heteropoda were introduced as the resident tank fauna.
I also added some Rotala sp. 'Rotundifolia' in the background to complement the current plants too.

All of the plants were growing and pearling with no algae issues... the rotala plants in the background grew very fast, so trimming them was a part of the regular weekly maintenance.
Echinodorus Tenellus looked nice and grew fast too, but became rather invasive as it had a tendency to shoot long runners across the tank, which made controlling where they grow rather tricky. It ended up looking like a network of white lines crisscrossing the substrate, so i planned to remove them and replace with something else.

Week 3
One day i was browsing online and chanced upon photos of aquascapes using just cryptocorynes, somehow i got inspired to change my aquascape mid-way into a "crypt tank", so i proceeded to pull out all the middle and background plants, and replaced them with various cryptocoryne plants (ie. c. wendtii, c. x willisii, c. albida etc).

I figured with the slower growth characteristics of cryptocorynes plants, it could become a low maintenance tank that didn't require as much maintenance too.

Now just need to wait...
Week 5
After 2 weeks of staring at cryptocorynes growing just a few leaves, it felt abit like watching paint dry... actually, paint dries faster than the growth of these plants!
I finally realized that i didn't have the actual patience to run a crypt tank (kudos to crypt tank owners for their incredible patience!), so i re-scaped it again and put back the fast growing plants.
This time around i changed the plant selection slightly and used Micranthemum Micranthemoides, Rotala sp. 'Rotundifolia' and Rotala sp. 'Wallichii' as the background plants, and Blyxa Japonica as the mid-ground transition plant.

I particularly like the fact that Blyxa Japonica is actually a stem plant, so it is not as invasive and stays exactly where i plant it. It looks great and is much easier for aquascaping.

Although the Eleocharis sp. 'Mini' carpet has been growing steadily so far, it'll still need more time to carpet the foreground area.
The shaded "path" under the twisty wood was still empty, as i still have not yet figured out what plants could be used to fill that area.
Week 8
Over the course of a few weeks, the Eleocharis sp. 'Mini' carpet started to spread very fast (most likely the roots have established properly and a critical mass of growth was reached), noticeably increasing its volume of new runners daily.

I felt that the Rotala sp. 'Wallichii' looked abit out of place in the background and tends to be abit messy during trimming (due to the fine needle-like leaves scattering about everywhere when cut), so i replaced it with more top cuttings from the Rotala sp. 'Rotundifolia'.
The shaded "path" is now carpeted with Anubias sp. 'Petite' using my super glue + pebbles method. Although its a rather unusual plant choice to create a carpet, i've found that it suits the shaded nature of the area and allows me to easily arrange them to shape the path.

Boraras Brigittae all active and colored up nicely, exhibiting a nice deep red sheen.

Otocinclus Cocama and Neocaridina Heteropoda busy grazing on the twisty wood covered with nice green fuzzy algae (which was purposely allowed to grow to add a naturally aged "look" to the wood).

And of course... every tank journal must have the obligatory "shrimplet spotted" photo! :)

Overall, i think this tank developed quite well over the span of 2 months. I'd consider the plants around 80% filled in at the moment, so its now a matter of maintaining healthy growth (and lots of trimming) to progress towards completing the aquascape.
Interestingly... i haven't experienced any significant algae issues so far yet (probably the balance of lights, Co2 and nutrients are currently just about right). I've not even had the need to clean the tank glass during all this time!
Hopefully this aquascape can still be maintained in good condition (and relatively algae-free) for the rest of the year. :)
Hello, Very nice tank you got there! I notice you used 1 UP Aqua LED for this setup. I've read online that for this tank size, 2 UP Auqa should be used. My question is, if I were to use just 1 unit, would it be sufficient lighting to grow HC carpet?
ReplyDeleteThanks for your help and i look forward to more beautiful tanks of yours!
Thanks!
DeleteWell, the choice of whether to use 1 or 2 set of the lightsets will depend on your layout, plant density/types and how much Co2/nutrients you plan to add in the tank.
In my case, i have a fairly open layout with medium growth plants in the foreground/midground, and a hedge of fast growth plants in the background. In addition, i wanted to also keep the Co2 and fertilizer dozing levels moderate over the long term to avoid potential overdosing issues that may affect my fishes and shrimps. After some trial and error, i've found that 1 lightset was more than sufficient to maintain healthy growth with minimal algae issues (i have tested 2 sets in similiar layout before and had to keep cleaning away algae every week, too much hassle).
For those who use 2 lightsets, they usually do so to enable light to reach more areas, especially if their layout has more hardscape which may block light or they have high demand plants that require more light to grow, and they are also increasing their Co2 injection and fertilizer dosing accordingly.
With more light the margin of error is narrower and any deficiencies appear faster, so more care has to be taken to keep everything in balance.
In your case, growing a HC carpet with just 1 set is possible, just make sure the layout has no blockage of light from hardscape or other plants, and the tank has good flow, Co2 and nutrients to match the growth. If you have blockage of light or want even faster growth, then 2 lightsets may be used, just have to adjust the Co2, nutrients and also photoperiod accordingly.
Note that the Z-Series lights are effective in tanks up to 36cm height, if you have a tank which is taller (depending on how far the plants are from the light), you may need to consider using other lightsets instead, those with higher powered LEDs and optics to focus the light deeper into the tank to reach plants at the substrate level.
Thank you for your advise!
ReplyDeleteWill keep that in mind when I go about setting up my tank.
I intend to create a Iwagumi landcape with just HC. I think its minimal blockage of light hence 1 set should be sufficient!
Also the thank is 36 cm in height so I think that should not be a problem
Keep up the blogging. :)
Hi there. Nice tank. Where is your CO2 diffuser? Also, do you use a pH controller or do you set the timer on the CO2? I would like to get a better understanding of how you dose CO2 exactly. Thanks!
ReplyDeleteI use an ISTA External Co2 Reactor, its situated inside the cabinet. You can see a photo of it in this link:
Deletehttp://www.urbanaquaria.com/2013/10/64-litre-forest-edge-tank-week-10-update.html
I don't use a pH controller, instead i use a solenoid regulator and just set a programmable plug timer to start the Co2 injection one hour before lights on and stop the Co2 injection one hour before lights off.
Could you please tell us about the background wallpaper that you are using on your tank?
ReplyDeleteThere isn't any background wallpaper used on the tank, just a plain white wall behind it. :)
DeleteHello! Do you place any Styrofoam below your tanks? Because I notice your outdoor tank and your 64litre tank have something at the bottom supporting them in-between your tank and your cabinet.. Can I check with you what it is and where to get them?
ReplyDeleteThose are high density foam mats designed for supporting the bases of glass tanks... they usually come packaged with the glass tanks, or you can buy them from most aquarium shops.
DeleteHello UA
ReplyDeleteLove reading your blog and great Aquascapes i just wanted to ask you the thickness of the glass on your 60cm tank? is 6mm ok for 60x35x40 crustal clear tank?
For my L60cm x D30cm x H36cm crystal glass tank (64 liters), it uses 6mm thickness glass.
DeleteFor a tank of L60cm x D35cm x H40cm dimensions, the water volume works out to around 84 liters, not sure if 6mm thickness glass is still okay for it though. If you are custom making the tank, can consider using 8mm glass thickness instead for extra safety margins.
Hi
ReplyDeleteOne more question, with the dosing of co2, fertiliser and carbon how do your shrimps survive? I've heard that co2 and fertiliser kills them.
Well, it all depends on the concentration of Co2 and ferts, and to a certain extent how sensitive the shrimps are.
DeleteI keep mainly neocaridina shrimps (ie. fire red shrimps) which are hardy enough to live and breed in planted tanks with Co2 injection and ample fert dosing.
Too much Co2 and/or ferts can affect shrimps... but in controlled moderate amounts, the shrimps can be okay. Its all about regulating the amount of Co2 and ferts so that they can be used up by the plant density fast enough to not accumulate until toxic levels.
The key is to adjust the Co2 and fertilizers so that those parameters are still within safe limits, just have to start low and gradually increase the injection rate and fert dosages to find the right balance.